Sunday, 30 September 2012

G R O W

R E N D E R S

Renders Produced so far:

- Here is my first stream of designs, based on my circle presedent

Here is my second stream of models and interations based on the sqaure design precedent I had, you can see two boxes inside which move freely inside

 Single render of my fourth interation from my second stream of models

Thursday, 27 September 2012

I N T E R A C T I V E  M O U S E  T O Y 

Further Development Ideas:

To further develop my code from here on I want to achieve:

- Adding an effective aquarium style background which creates depth and and an aesthetically pleasing background that matches my theme, 

Something like this for example could look effective and create a nice aesthetic depth.


- Add the Shark as the mouse image to relate directly to my story boards
- make it so the fish move more directionally and avoid the shark


I will work on developing these ideas from now and feed back I obtain from the interim presentations. 
I N T E R A C T I V E  M O U S E  T O Y 

Development:

I have bee working on my code and trying to develop it further to  represent my idea more effectively. I have decided to void the flocking idea as I felt they didn't interpret enough motion to represent a living being and it was quite boring so I have take a different approach, I have used the internet to help me and this is what I have done so far:


 Here we can see my first interaction on my code, as I move my mouse the fish follow it with their heads facing forwards but they never come in contact with the mouse, if you move the mouse to the right it will follow but keep its distance, as the fish are still they move around and bump into each other as if they are a live, they don't become static which is visually pleasing and what I wanted to achieve from this code.


In my second image we can see when the mouse is moved to the right  all the fish follow the mouse movement and as they do they move in a jiggery manner where they bump into each other and it looks effective and real.


In this scene we see the mouse click interaction where when the mouse is clicked the fish move to the point of the mouse and all start to spin in a vortex form, this is identical to the idea on my story board. All the fish form a circular vortex


Here we see the vortex motion that clicking the mouse provides, in my final I want it so the mouse is a shark and once the fish vortex they are not visible until I release the mouse click.  Something to further develop


Here we see when the mouse click is released all of the fish are shot out back to their position away from the form which will be the shark and then the interaction is ready to start again.


Monday, 24 September 2012

I N T E R A C T I V E  M O U S E  T O Y 

Week Eight Summary:

Tutorial Two;

I have started to play with some coding, I found a process called "flocking" which is effective and conveys a good movement shapes and creates an alive aesthetic.

I started with this code which was on open processing;


I altered this code to change the shape and create nother render where there is another group of circles and then change the fill and back ground colors to create an effective visualization 


From this I want to start altering this code to make the flock follow the mouse.

I N T E R A C T I V E  M O U S E  T O Y 

Week Eight Summary:

Tutorial One:

Today we did an exercise with a partner to create a real live interaction which anyone could use and we would ask those same three questions that we have been applying to everything. I worked with Zak and our interface was when he winked his left eye I would do a specific indian move, if he winked his right eye I would do a different one and if he blinked with both of his eyes then I would perform another dance move. To add variables we made it so how ever fast he blinked differentiated how fast I would be dancing. 

After we finished that we were told to find similar codes already present on the open processing website for is to use as precedents and closely work next too.

I found these codes:

http://www.openprocessing.org/sketch/23111

I liked this code as it is achieve something very similar to what I want to achieve with my code, the fish feel alive through the movement through their body and even the background has been made effectively. I think this code will be very useful for me as it is what I want. the interaction for the food when you click the mouse is slow and fish take a long time to change their direction. Overall an effective code, answering the questions it takes me 5 seconds to learn the interaction, once I learn the interaction it isn't very interesting as it is very repudiative


http://www.openprocessing.org/sketch/6860


I found this interaction interesting because I like the aspects of the shape acting as if they are alive, looks interesting and works effectively. They bump into each other can then create new paths, this is how I want my shapes to interact with each other in my code, it looks effective and once you learn the interaction you can carry on enjoying it as you don't know how it will suddenly stop or change direction, effective code and I will be using this for my own. 

http://www.openprocessing.org/sketch/9298


I like this code as the interaction is interesting and both different to the two above, the flocks follow the mouse and create an effective visualization whilst doing so. Colors are basic and the shapes have no fill, looks effective and I like the mouse following interaction which I want to apply to my own code.


I have started to code on processing and I will upload them in my next blogpost. 

Sunday, 23 September 2012

G R O W

Week Nine Summary:

Tutorial One:

Today we were introduced to the third and final project for this course, Sunny went over what we are trying to achieve again and then we started straight away. Initially we started to talk about research and we were instructed to find 6-10 precedent images as well as 3 images of different materials. I hit the google search and this is what I found:


P R E C E D E N T  I M A G E S
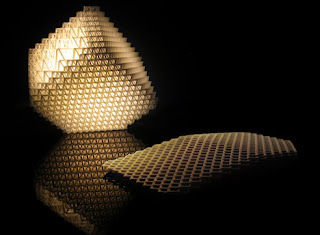
 I like this lazer cut model as it dosnt have like a conforming shape/strucutre which holds it all together but the pattern on the design creates the shape itself. The mesh like design creates an abstract feel to the design and esthetically loks very pleasing
 With this precedent I like the way that the model conforms around a middle structure but it is all intertwined, really expresse how strucutres like these can only be presented through 3D printing.


 This imge is of the same model as above except with different redners to express different textures and materials. lighting with this model looks very effective as it comes thoough effectively with the
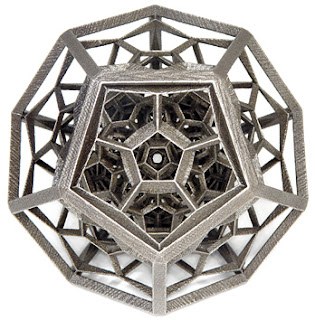
 I really like this sctrucute as it contains objects conformed in objects which can effectiveily only be created on the computor through the 3D printer. I might use this precedent closely for my sketchws and have the shapes in the model moving.
 I like this image as it displays the inside of the model, looks alive like the inside of a cell. I like the asymetrical pattern on this design, aspects are clear and looks effective.
 I like the symetrical pattern on this design, symettry is key and it is clearly shown on this design and workes effectivily. I can see myself using this precedent to work closes with to make my sketch
 I looked into this precedent as the patterns stood out to me, looks very effective with the lighting through the model, emphasies the detail greatly and creates an effective aesthetic.
Simple but effective, this design has no real pattern although I like the form as the design intertwines and looks effective.


M A T E R I A L

PLASTIC:

This forms made from plastic, effective and strong but shows no real strucutre in a render on 3Ds Max


Here I have wood as a material, effecive to render with as wood can create  really nice aesthetic and it looks really effective once applied.


Metal is always an effective material to apply to a render, bring out good details with effective shadows and lighting. Will most likely uses this material or wood.


S K E T C H E S

After I did some research into precedents and material I started doing some basic sketches on some ideas I have generate in my head.

For my first sketch I wanted to base it on my precedent on the right with the rectangles contained within  rectangles. For my sketch I drew a square with a square contained inside, the square will rotate and oscillate inside when the exterior box is static. I like this idea of providing movement inside the contained square and the sense of bringing life to something that could not be done without the use of a 3D printer.  
For my second sketch on the right I based the sketch on my precedent on the right trying to base it on a similar pattern. I like the circular pattern applied as it looks aesthetically pleasing and will show an effective effect when held in your hand as well as an effective texture applied when you feel it. 
For my third sketch I was looking at creating a form in a circle shape but then cutting away to create an effective form that looks aesthetically pleasing. I would like to create this on 3Ds Max and twist it to make an effective model. Also added a pattern in the middle like a cross to add texture and complexity.

For my last sketch I based my idea on a cone but it is split up to create segments which are all separate. I don't think this shape will be effective as with the 30x30x30 restrictions that have been given to this project. I think I shall stick to square or circle initial forms to work with 


D I G I T A L  M O D E L S 

I started to play around with my ideas on 3Ds Max and I came up with this 


I made a simple circle with a mesh pattern applied to it, to develop this I could make a more effect pattern applied to the exterior of the circle or add a circle inside which would move free by itself.
N A V I G A T I O N  I N T E R F A C E 

Interim Feed Back:

After I explained my idea to the class they all gave me constructive feed back, some questions that were raised such as;

- Do you need the iphone or map if you have the hologram arrow?
- How can you make the arrow more interesting opposed to just a boring arrow?
- Look into angles and how the user holds the phone
- Make it "great" (Tutor Zane)

I have considered this feed back and thought about how I am going to develop my concept to make it better and more interactive. I have thought about the holographic aspect of my interface and how I could just apply my map to the arrow so you don't have to constantly keep looking at your iPhone to view the mapping which fixes the angle problem and the making it great aspects of the design. This will answer and fix all my problems and effectively make my idea "great". 

From now I want to move into flash so I can start to develop my idea further and get ready for hand in next Friday. 
N A V I G A T I O N  I N T E R F A C E 

Interim Hand In:


N A V I G A T I O N  I N T E R F A C E 

Week Eight Summary:

Tutorial One:

Today we further discussed our ideas and developed them more deeply. We went around in a circle and got feed back from the tutor and the group. I explained my application idea with the holographic application interface as well.

I told the group;

I am intending to make my app which will be a basic iPhone application with three options of "where am I?", "Search" or "Student Data Base" where each has its own search interface which then will give you the mapping guide to your destination. With the mapping interface there will be two maps displayed one in perspective view and one in satellite. There will be widgets such as the arrow holographically displayed to give guidance. 

After that we talked about story board and the requirements for fridays tutorial. 

Thursday, 20 September 2012

I N T E R A C T I V E  M O U S E  T O Y 

Photoshoped Story Board:

I have created this story bored to convey my initial idea and how I will develop a code over time to create this interaction which I have in my head.


Story Board Descriptions:

  1. Fish move around by themselves as if they are a living being. they avoid contact with the shark as it is a predator, as you move the shark so do the fish avoiding the shark.
  2. In this scene we see how then the shark is moved around  by the mouse movement and the fish avoid the shark by swimming in different directions. 
  3. When the mouse is clicked and you move the mouse around the shark the fish are all sucked into the sharks mouth showing a eating motion provided by the mouse-pressed function
  4. Once all the fish have been consumed the shark will advance in size and no fish will remain on screen. 
  5. when the mouse click is released the  fish all explode from the shark in a vertex motion creating a aesthetically pleasing visualization.
  6. once the fish have all been released the code goes back to square one and the interaction is rest. 
After this I will do some more research into existing codes on open processing to gain inspiration and generate idea and then I will start to create my own code. 


Wednesday, 19 September 2012

F A B R I C A T E

Final model:


Final Revised Model Render:


F A B R I C A T E 

With my sixth sketch I found some problems ad it was the laser cut but card model which i used to find any glitches which worked to my advantage as I did find some problems. 

The tabs which connect to the middle octagon conflicted with each other so Ive had to space them apart so they would not snap 

Also they would not all fit straight so I had to alter it so it would fit better and come together as one


Over all I am happy and cant wait to produce my final design :)
F A B R I C A T E

Development:

Here is my final illustrator file for the laser cuter 


F A B R I C A T E 

Development:

For my fifth sketch I look at the properties of how the metal which goes through the whole model in the octagon and effectively holds it all together.

I really like this concept that I have developed as I feel it plays a big role in my model as it dosnt just give the model strength and an aesthetically please aspect but it also provides a sens of my model being the bottom part where I have the strands of wire coming through the bottom.


As you can see in the bottom of the model you can see what I am talking about and how this will be represented with my wire framing.


From this now I will make my illustrator file to give to the tutors on monday to print of to construct my model!
F A B R I C A T E 

Development:

For my third sketch I started looking into the second sector of my model which requires a more complicated slot method as the middle octagon has not only bottom side walls attaching to it but also top. 

The middle section acts as like the heart of the model, it holds everything together so it is very important. 

 Here to make it work I have the face of the tab which will have a tab at the top and a tab at the bottom although at the bottom tab it has two tabs so that on my octagon in the middle section it will have two to click into that octagon with another one from the other face coming through the bottom as shown in the image below.
 Here is the upper piece which clicks upwards into the middle section of the octagon.
Here is an image showing how it locks into place on both top and bottom to create a strong binding and keeps it looking good.

Starting to think about aesthetics I want the slots to be longer so they overlap and create a spiky aesthetic feeling which should work effectively and look nice. 


Now that I have the top and bottom tabs sorted its time to think about the metal pieces running and the top section of my structure. 
F A B R I C A T E 

Development:

I have made my second set of sketches today starting to develop and look at how I am going to produce  my slots and slits for my model to join together strongly to hold the form. 

To create my model I have 3 octagon shapes which have 8 sidewalls which lead to the next octagon which then have the same to the third to express my form as shown in the earlier sketch, to join the side walls and octagon together.


 Here we have the side wall which I have ruffly created. I have created a tab like cut at the bottom which will slot into the female end of the octagon.
 Here we have both the male and female join points which will effectively hold the model together. it slots in flush so it also looks aesthetically pleasing and just not providing function.
Here we have how it will look finished with the slot holding it together. The pieces stay in place due to friction provided through the two materials and the sizing of the slots.


In order for the slots to be flush the male side must be 2mm long as the acrylic is 2mm thick so effectively it will be flush.

Next sketch I will be producing will be to show the next connection tab for the middle piece as it will be more complicated having to slot into two sides. 
F A B R I C A T E 

Development:

Today I made my first sketch mode from the orthographic image I made last week, I used the sections I created to make a similar concept.

Here is the sketch model which I produced, I do realize that it is held together with tape, but I only used it to generate my ideas of how the model could look. I like this sketch as it displays the basic form of my model with the three sections from top to bottom. I have used the metal wire to go through from top to bottom to create a strength to the structure but as well as that I chose to use the wire as it represented the leg like forms at the bottom which I think is very effective as it gives the structure a back bone and strength through the model. The form is good but I think it needs to express my words better like brittle, through thin poles and spikier fixtures. 


Looking at this image with the sketch model I have made you can see the similarities through both of the forms, the wire really strings everything together as the structure displays the frame and the metal keeps it all together. It will also look very effective with the acrylic as you will be able to see the wireframe in the centre of the model like a skeleton or bones of the model. 


After this sketch model I need to start thinking about joints and slots for how the model will come together without the use of any adhesive. 
F A B R I C A T E 

Week Six Summary:

Tutorial Two:

Today we carried on with our sectioning work, Sunny came in and told us about hand after the mid trimester break, what is necessary and the specifications of he paper (the color and line width etc). As last tutorial I realized that the stack method wont work for me I have started to think about another method. 


I created a orthographic type image to start thinking about the form of my model as I am going to use the sketch method to create my model were I strip back the detail and create the form and shape myself.

Making an orthographic image like this was effective as I could see each side of my model an start to think about how I will express it and which qualities I will be emphasizing. 

I then chose this front view as I thought it best represented my model as it showed the movement the best through the model from top to bottom. 

As you can see in the image there are three main sections in the model I have emphasized through the lines. The three sections consist of the top largest layer, followed by the smaller and then smallest with the leg like figures at the bottom. 


From this I hope to make a ruff model which then I can take the concept and create slots to all put on illustrator to create my final model! 


As it is mid-trimester break I intend to over the break create sketch models which will help me to produce my illustrator files which the tutors will use to cut my files to create my model. 

F A B R I C A T E 

Week Six Summary:

Tutorial One:

Before class I looked into precedents to base my model around and get some inspiration for what I am going to achieve and how to base my model around. After a long time of search the internet for laser cutting artist I found work by Philip Beesley which really inspired me and I could relate my model to his work as it created an effective movement which is quite similar and his work just looked amazing in general. 


http://whitehotmagazine.com/index.php?action=articles&wh_article_id=1020

Above is one of his exhibitions which he created and you can just straight away see that stunning movement between the forms which just create a sense of the acrylic becoming alive. It just creates an aesthetically pleasing piece of art work especially with the effective lighting. From this I want to create movement like present in this work as well as take aspects like the sectioning used in this art.


As a second precedent to start to base my model around I started to look into artist Ara Peterson we also using laser cutting to produce artwork.


This is one of her more recent works, the aspects which I like about this model is the symmetry applied to the form which I can link to my model as I feel it is quite symmetrical. She is a good precedent as I can base my symmetry off her work. I also like the color combination, although I wont be doing anything as extreme on my work.

During our tutorial Earl took us through a method which we could use to create our model, the section method. The section method is were you take your 3D model on the computer and section it to a certain height and according to your specifications then once printed you stack the laser cut files which which effectively create your model.

This model has been created using the stack method, looks effective but I am having doubt about this method working for me at this stage.


As we started sectioning our models and Earl taking us through the tutorial on the section method I realized that my model will not be able to be reproduced using the section method as it were to detailed and as you look at the middle section of my model (as it is kind of split into three sections) you can see how the strands are all spit and are not as one piece so when I section it, it would be a large job cleaning up the files on illustrator when producing my file for the laser cutter. Therefore I am going to have to use a different method to create my model.


Other methods would be the slot method which would require me to simplify my model and then create my self on illustrator to create my model.